Options for Buttons
3 minute readIn this article, we will be going through the four main options for card buttons and quick reply buttons.
There are 4 main option for buttons:
- Action: Allows you to direct users to another content node, capture value, set language, escalate to live agent, set department, start form, start flow, perform API integration, embed content and other custom events
- Website: Directs the user to a website.
- Phone: Initiates a call
- Microsite: Allows you to display content that is richer and more complex than text, e.g. tables, charts and interactive elements
Note: Only the action option is available for Quick Reply buttons.
Action
Show Content: Allows you to direct the user to another content node.

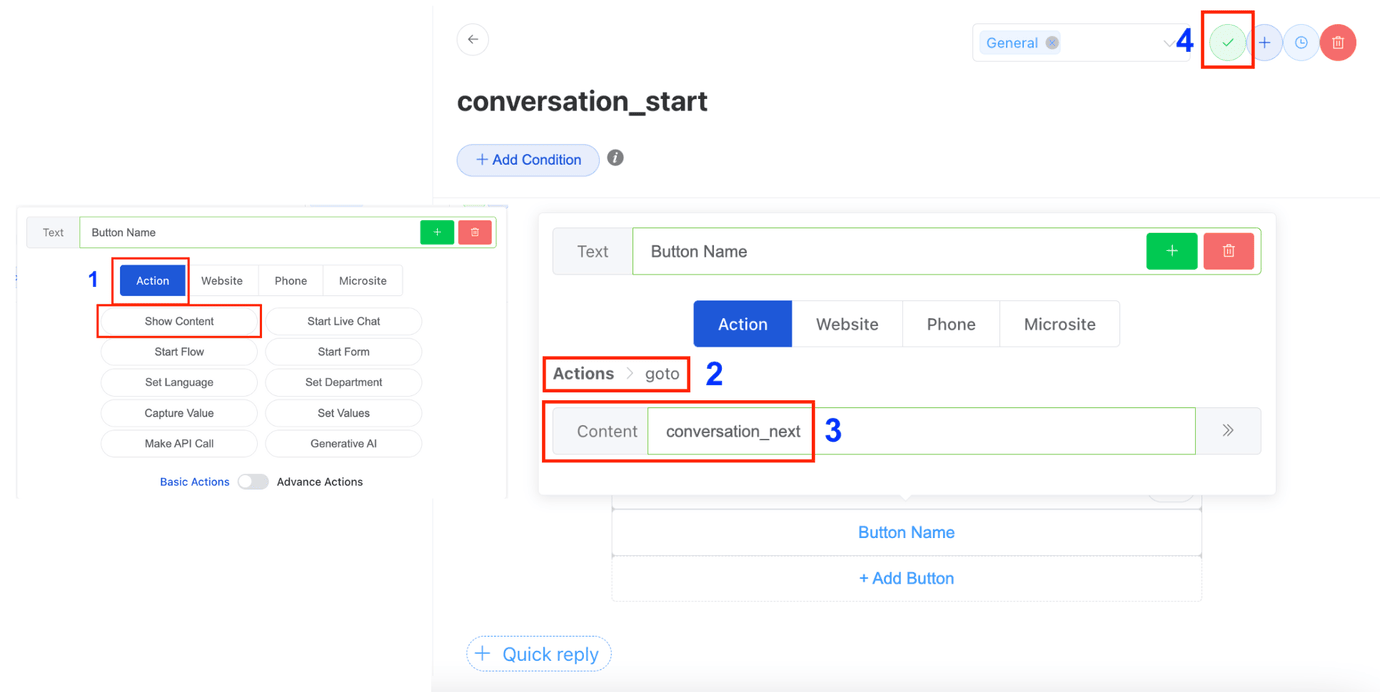
- After you add a button, click on ‘Action’, followed by ‘Show Content’.
- The Action field will display ‘goto’.
- In the Data field, either select the content node from the list or type to search for the content node you would like to display.
- Click on the tick on the header bar to save the content node.
Capture Value: Allows you to capture data from users.

- After you add a button, click on ‘Action’, followed by ‘Capture Value’.
- The Action field will display ‘capture’.
- Key refers to the attribute that you want to measure.
- Select from either User Input, Text, Number, or Boolean. For full details, refer to Capture Data Types.
- Click on the tick on the header bar to save the content node.
Set Language: To capture the language chosen by user if the business uses a multiple language.

- After you add a button, click on ‘Action’, followed by ‘Set Language’.
- The action field will display ‘capture’
- In the Value field, type in the language code based on ISO 639-1.
Refer to the language code here
- Click on the tick on the header bar to save the content node.
Escalate to Agent: To escalate the chat to a live agent.

- After you add a button, click on ‘Action’, followed by ‘Start Live Chat’.
- The action field will display ‘handover_router’,
- Click on the tick on the header bar to save the content node.
Set Department: To capture the department chosen by user if the business uses a multiple department

- After you add a button, click on ‘Action’, followed by ‘Set Department’.
- The action field will display ‘capture’
- In the Select Department, choose the department you want from the dropdown list, and select it.
- Click on the tick on the header bar to save the content node.
Start Form: To launch a particular form.

- After you add a button, click on ‘Action’, followed by ‘Start Form’.
- The Action field will display ‘form_processor’,
- Enter the Form Name.
- Click on the tick on the header bar to save the content node.
Start Flow: To start a particular flow.

- After you add a button, click on ‘Action’, followed by ‘Start Flow’.
- The Action field will display ‘startflow’,
- Enter the Flow ID.
- Click on the tick on the header bar to save the content node.
API Call: For API integrations.

- After you add a button, click on ‘Action’, followed by ‘API Call’.
- The Action field will display ‘callApi’,
- In the Mapping field, search for the API integration you want, and select it.
- Click on the tick on the header bar to save the content node.
Embed Content: Allows the bot to open an iframe web window to direct users to a certain image URL, or to use a web widget.

- After you add a button, click on ‘Action’, followed by ‘Embed Content’.
- The Action field will display ‘$display’,
- Enter the URL below the field labeled 'Type', which is set to ‘iframe’.
- Click on the tick on the header bar to save the content node.
Custom Event: This requires the use of the advanced edition, and is an advanced section to be filled in by KeyReply developers. This is not recommended for use by the Dashboard user.
Website
Website: Allows you to direct the user to a website.

- After you add a Button, click on ‘Website’.
- Enter the Website URL in the text box.
- Click on the tick on the header bar to save the content node.
Phone
Phone: Allows you to add a phone number to perform an outbound call.

- After you add a Button, click on ‘Phone’.
- Enter the phone number in the text box.
The phone number must contain the ‘+’ prefix, country code, area code, and the local number. For example, +6597478375. - Click on the tick on the header bar to save the content node.
Microsite
Microsite – Allow you to show content that is more complex than texts, e.g. tables, charts, and other interactive elements.

- After you add a Button, click on ‘Microsite’.
- Select a web page from the dropdown list.
Refer to Create a Web Page to learn how to create a web page - Click on the tick on the header bar to save the content node.
Email: Allows the user to launch their mail client to send an email
- There is a way to activate end user’s default mail client for them to send an email. The trigger point will be from a button (or text):
- In text message, use the hyperlink method [text](mailto:email_content)

- In button, select “Website” beside Action, and fill in the “Website URL” field with: mailto:email_content email_content
- For email content, you can define the email address to send to, cc, bcc, subject and body.
- Replace space between words with “%20” and line break with “%0D%0A”
- Use ? for the first parameter delimiter and & for the subsequent parameters delimiter
- Read up more here: https://www.rapidtables.com/web/html/mailto.html
- Here’s an example:
mailto:cspm@keyreply.com?subject=This%20is%20TEST%20EMAIL&body=welcome%20to%20KeyReply%0D%0AI%20want%20to%20speak%20to%20CSPM%20Team
- In text message, use the hyperlink method [text](mailto:email_content)